

|
|
|
|||||||||||||||
|
|
|
|
|
|||||||||||||
|
|
|
|
|
|||||||||||||
|
|
|
|||||||||||||||
|
|
|
|
|
|||||||||||||
|
|
|
|||||||||||||||
|
|
|
|
|
|||||||||||||
|
|
|
|||||||||||||||
|
|
|
|||||||||||||||
|
|
|
|
||||||||||||||
|
|
|
|
|
|||||||||||||
|
|
|
|||||||||||||||
|
|
|
|||||||||||||||
|
|
|
|
|
|
|
|||||||||||
|
|
|
|
|
|
|
|
|
|
|
|
|
|
|
|
|
|
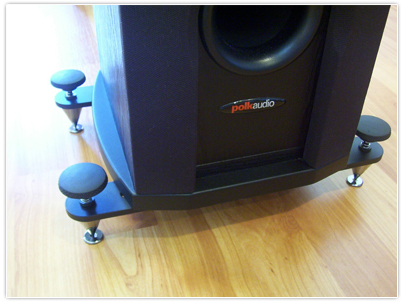
Installation of our outriggers are simple. If you do not already have inserts in your speakers then please scroll down to see the insert installation process. |
|
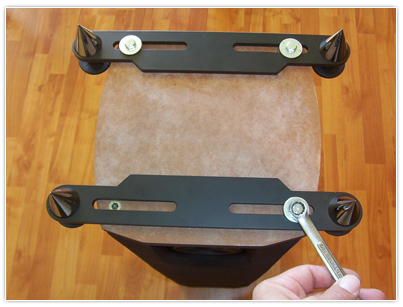
| 1. Locate (2) outriggers per speaker with the inserts showing in center of mounting slots. Use (1)
large washer, (1) split (locking) washer, and (1) bolt per mounting insert. Align outrigger so that there is an even distance side to side. Do not over tighten!! Bolt should be snug and outrigger flush to bottom of speaker. Over tightening can cause insert to loosen from speaker. Note: The tips of the spikes are designed so that different lengths can be used, hence the different 1.50" and 2.10" lengths. Once you are satisfied with the tip length we suggest using a mild thread locker to keep the tip secure in the base cone. This will keep the tip from coming loose through adjustments made later in your setup. |
 That's it!! |
|
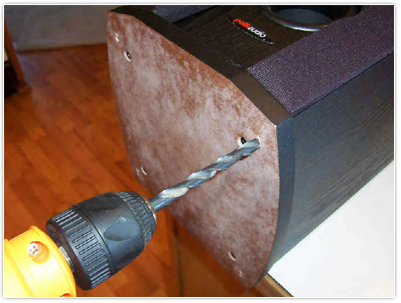
Insert Installation If your speakers do not have inserts already installed into the bottoms of your speaker then no problem. Every set of our outriggers ship with (8) 1/4-20 inserts. These can be installed directly into the bottom of your speakers as shown below, or they can be installed into sacrificial pieces of wood and then glued onto the bottom of your speakers as one of our customers Chris explains at the following link. We suggest installing an insert into a piece of scrap wood before installing the inserts into your speakers. This gives you the feel for what to look for. Because the insert is a screw in type you will be able to unscrew and use again with your project. 1. Layout and pre-drill the locations for your spikes on the bottom of your speakers to an approx depth of .65”. I use a 1/8” drill bit for this. 2. Using a 23/64 or 9 MM drill then drill at the predrilled holes to a depth of at least .65”. |
 |
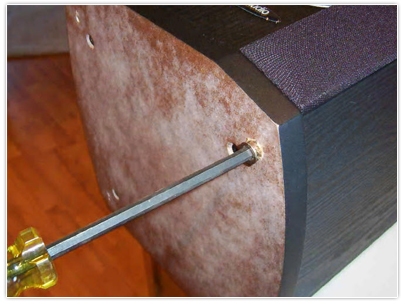
| 3. Place the insert into the opening of the hole and screw insert into hole using a M6 or 7/32 Allen wrench. Screw so that insert is flush with bottom of speaker. |
 |
| 4. Locate (2)
outriggers per speaker with the inserts showing in center of mounting
slots. Use (1) large washer, (1) split (locking) washer, and (1) bolt per mounting insert. Align outrigger so that there is an even distance side to side. Do not over tighten!! Bolt should be snug and outrigger flush to bottom of speaker. Over tightening can cause insert to loosen from speaker. Note: The tips of the spikes are designed so that different lengths can be used, hence the different 1.50" and 2.10" lengths. Once you are satisfied with the tip length we suggest using a mild thread locker to keep the tip secure in the base cone. This will keep the tip from coming loose through adjustments made later in your setup. |
|
|
|
|
|
Home | Solutions | Products | Gallery | Contact Us |
|
|
|
| © 2016 Soundocity. All rights reserved. |
Keywords:
Speaker Stands
Speaker Spikes Floor Cones
Floor Cones Audio Cones
Floor Spikes Speaker Tweaks
Replacement Parts Speaker Spike
Floor Standing Speakers Floor Standing Speaker Stands Loudspeaker Stands
Speaker Plinths Speaker Vibration
Speaker Isolation Inert
Speaker Feet Vibrations
Shaking Accessories
Subwoofer Set-up
Adjusting FAQ
Pricing Retail
Dealer Info
Information Repair
DIY User manual
Feet Plinth